
Table of contents:
- Data models
- SafeDeleteModel
- Authorization
- Email sending
- Product filtering & ordering
- Static files and media
- Implementing payment methods (
PaymentAPI) - Connecting external services (
NotificationAPI)
As mentioned in Architecture section, ecoseller’s backend is mainly a django application. It consists of main core project and following apps:
api- provides logic of NotificationAPI and PaymentsAPI for integration of 3rd party payment methods and notifying external servicescart- provides functionality for user’s cartcategory- provides functionality for product categoriescms- provides functionality for content pagescore- main app of the projectcountry- provides functionality for countries, addresses, shipping and billing information, currencies and VAT groupsemails- provides functionality for order confirmation emailsorder- provides functionality for ordersproduct- provides functionality for products and product variantsreview- provides functionality for product reviewsroles- provides functionality for user roles and permissionssearch- provides functionality for searching products using ElasticSearchuser- provides functionality for user related operations
To see the full core API specification, navigate to localhost:8000/swagger/ (if you are running the application locally). This will open the Swagger UI, where you can see all the endpoints and their documentation. Beware that many endpoints are protected by authorization, so you will not be able to access them without a proper JWT token.
Data models
In this section we will describe data models of the backend part of the application. To do so, we will go over various parts of system and describe them in more detail using diagrams.
To create diagrams, we used django-extensions app and its Graph models part, which generates a Graphviz .dot file from our django models. From that .dot file we used GraphvizOnline site to generate images of the diagrams.
The whole diagram of the models is shown below:
Due to the size of the diagram and complexity of the system, we will go over the models in smaller groups.
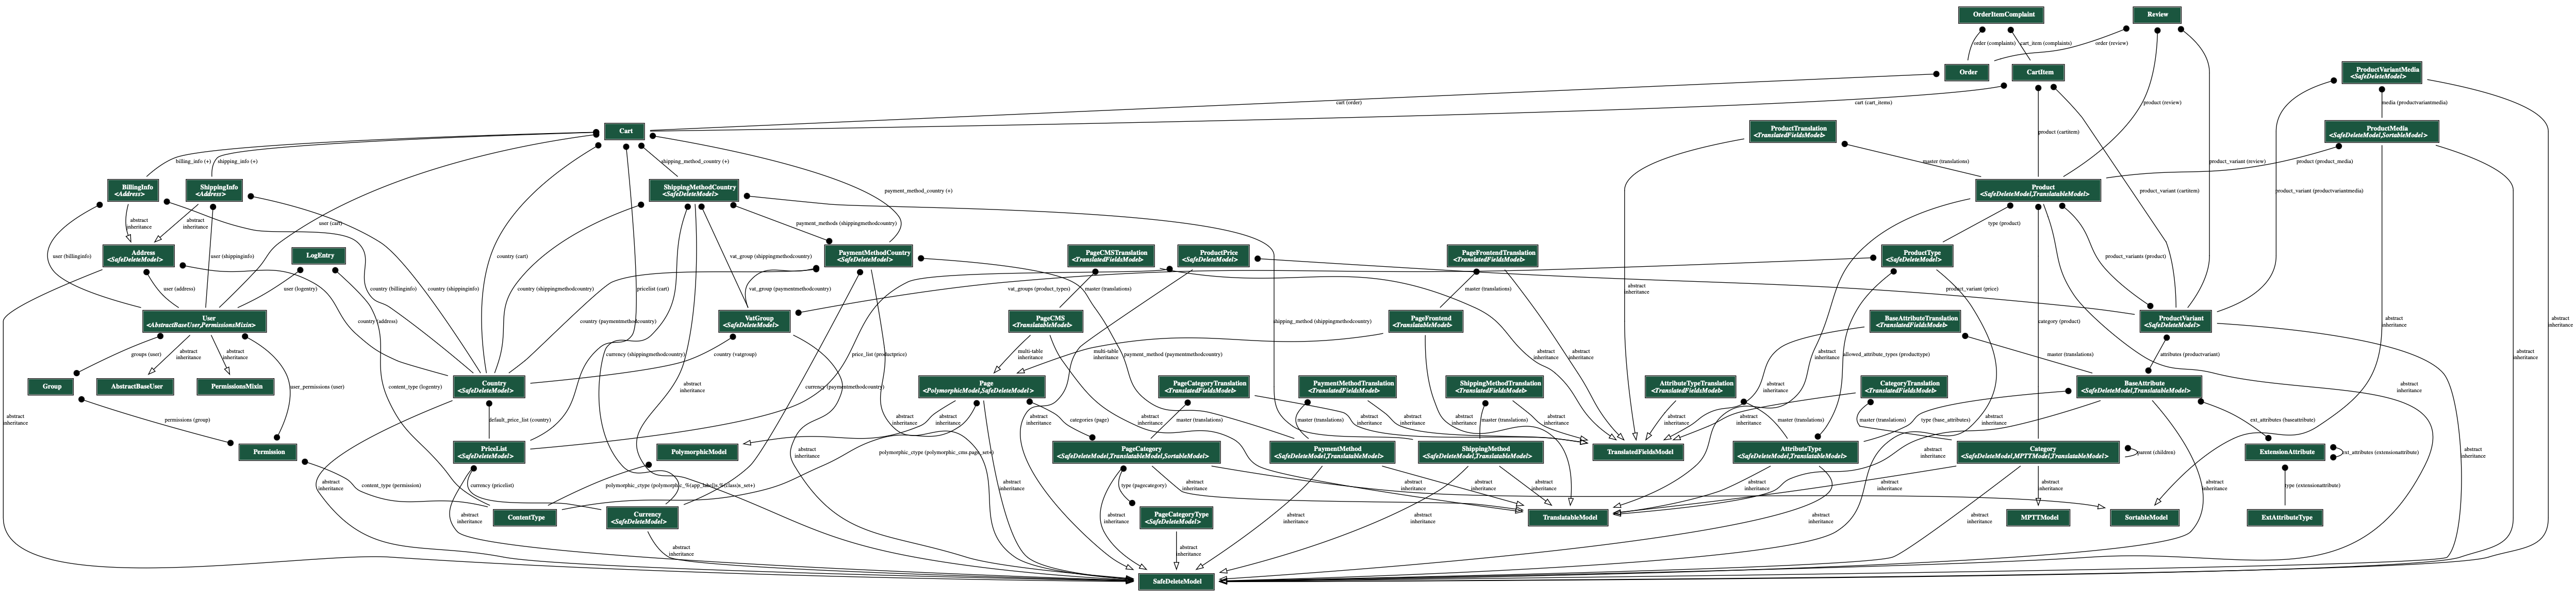
Country
Above is the diagram of models with country specific data. The model is defined in backend/core/country/models.py file.
The main “building” block is a Country model which holds all the data related to countries - like name, code, language, pricelist and vat groups.
VatGroup itself defines binding between country and VAT percentage.
Currency looks like a separate model with no relations, but it’s mainly related to the PriceList model which will be described in a later sections.
Address model is used to store addresses of users and is used during checkout process or are directly bindined to Cart model as well as User model.
ShippingInfo and BillingInfo models are used to store user’s shipping and billing information during checkout process. They inherit from Address model and add some additional fields.
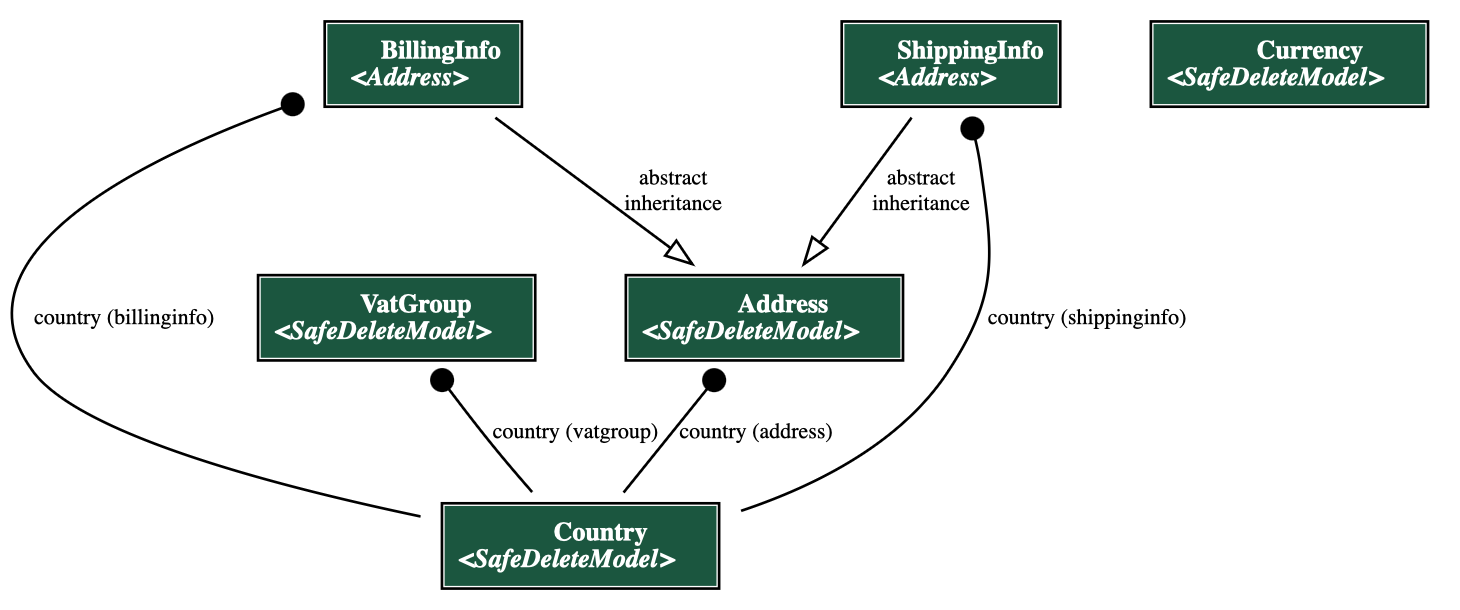
Product
Above is the diagram of models related to products and categories. The models are defined in backend/core/product/models.py file and are divided into 2 groups:
- Product models - models that are directly related to products. They are:
Product- main product model.ProductMedia- model for product media. It has a FK toProductmodel.ProductType- model for product types. It defines the type of product (e.g. t-shirts, coffee, etc.). It defines allowedAttributeTypes for product variants of this type and vat group for each country of this product.Category- model for product categories. It’s a tree structure, so it has aparentfield which is a FK to itself.
- Product Variant models - models that are related to product variants. They are:
ProductVariant- main product variant model. It has a FK toProductmodel.AttributeType- model for product variant attributes. It defines the type of attribute (e.g. color, size, etc.).BaseAttribute- model for product variant attribute values. It defines the value of attribute (e.g. red, blue, etc.). It has a FK toAttributeTypemodel.
Logic behind product variants is that each product variant has a set of attributes, which are defined by AttributeType model. Each attribute has a value, which is defined by BaseAttribute model. For example, if we have a product variant of type t-shirt, it will have 2 attributes: color and size. Each attribute will have a value, e.g. color will have values red, blue, green, etc. and size will have values S, M, L, etc.
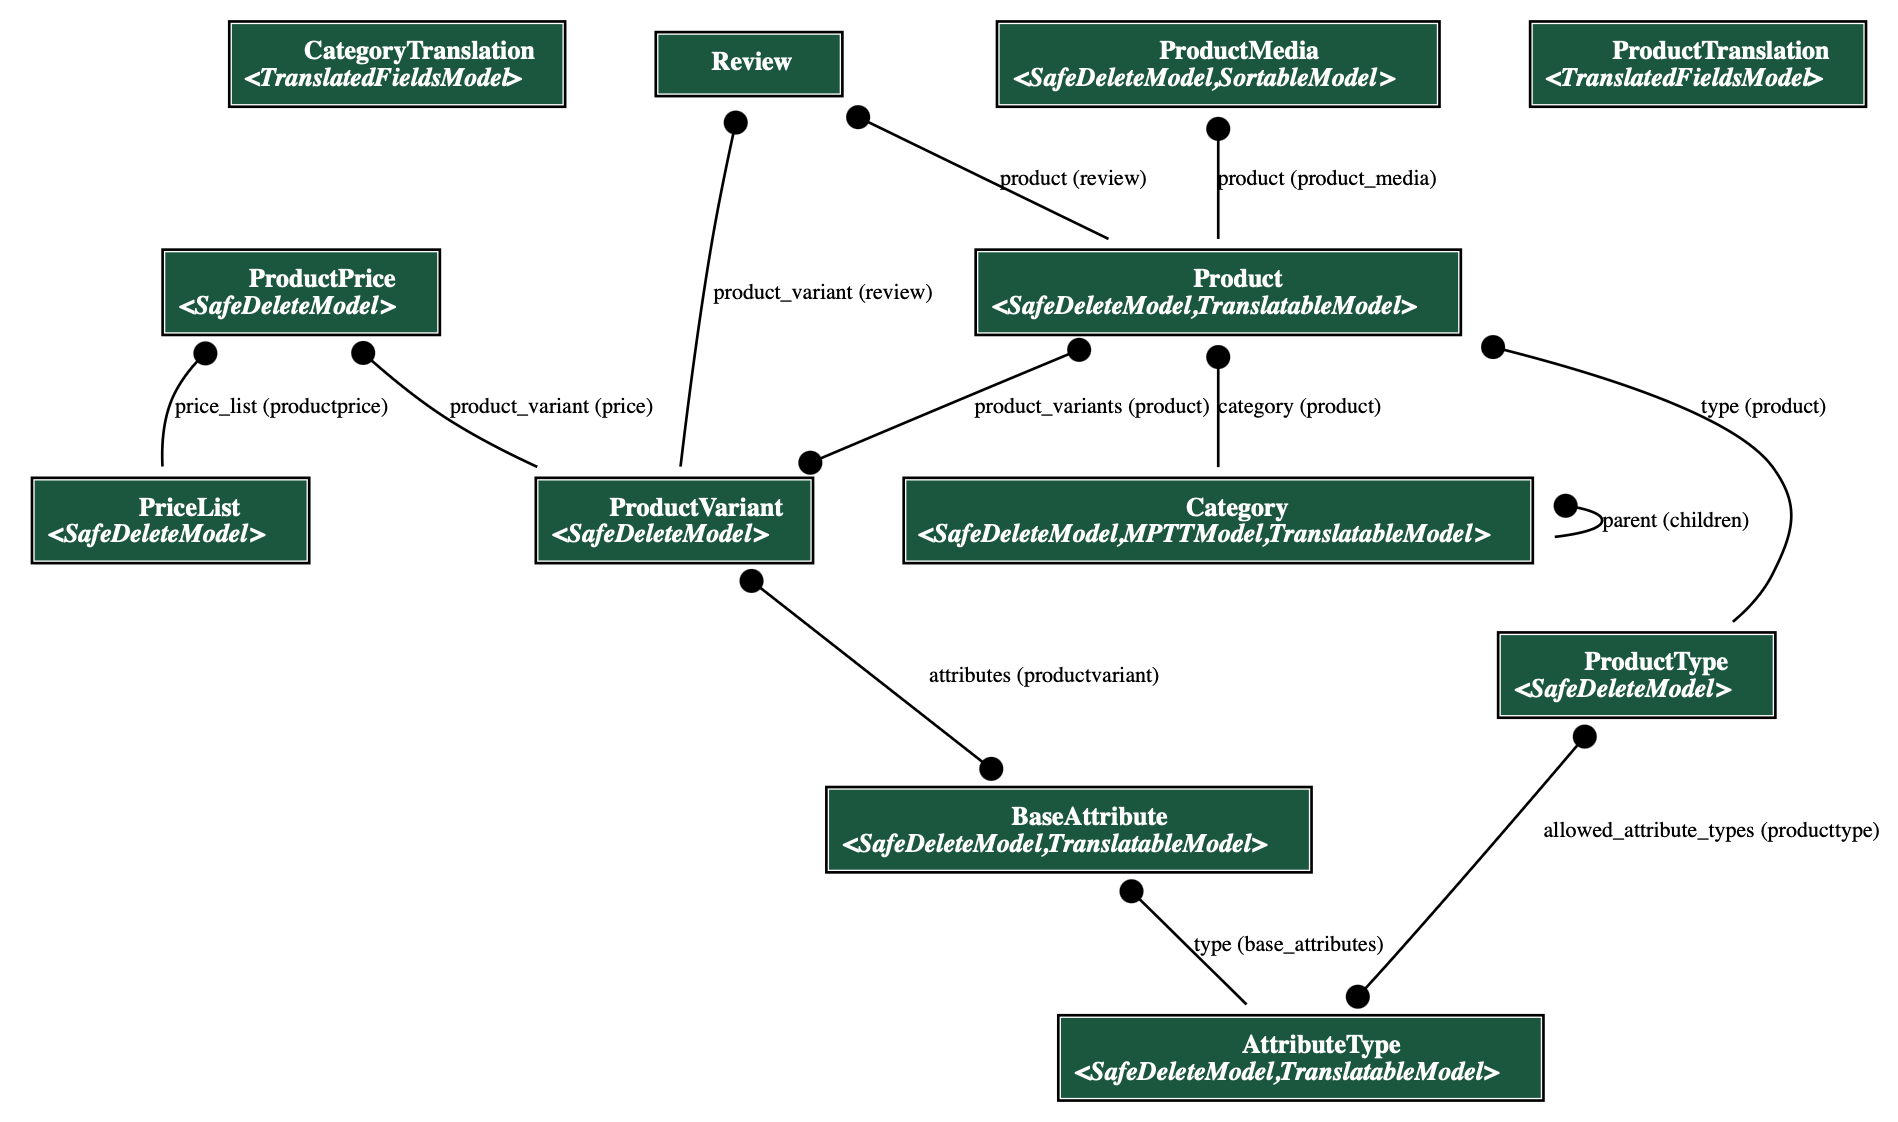
Pricelist/Currency
Above is the diagram of models related to price lists and currencies. The models are defined in backend/core/product/models.py and backend/core/country/models.py files.
Every price (ProductPrice) represents a price of ProductVariant in a PriceList. Where PriceList usually represents a specific group of prices - it might be a group of prices for a specific country or a group of prices for a specific customers (like B2B or B2C). PriceList is also related to Currency model, which defines the currency of the prices in the price list.
The interesting part of ecoseller pricing logic comes as VatGroup model which allows you to define different VAT groups for different countries. This allows you to have different VAT value (incl. different group of VAT - reduced, standard, …) for different countries.
With this logic, you can define a price list for a specific country and define different VAT groups for different countries. This allows you to have different prices for different countries, which is a common practice in e-commerce (for example due to different expenses for marketing, stocking, etc.).
CMS
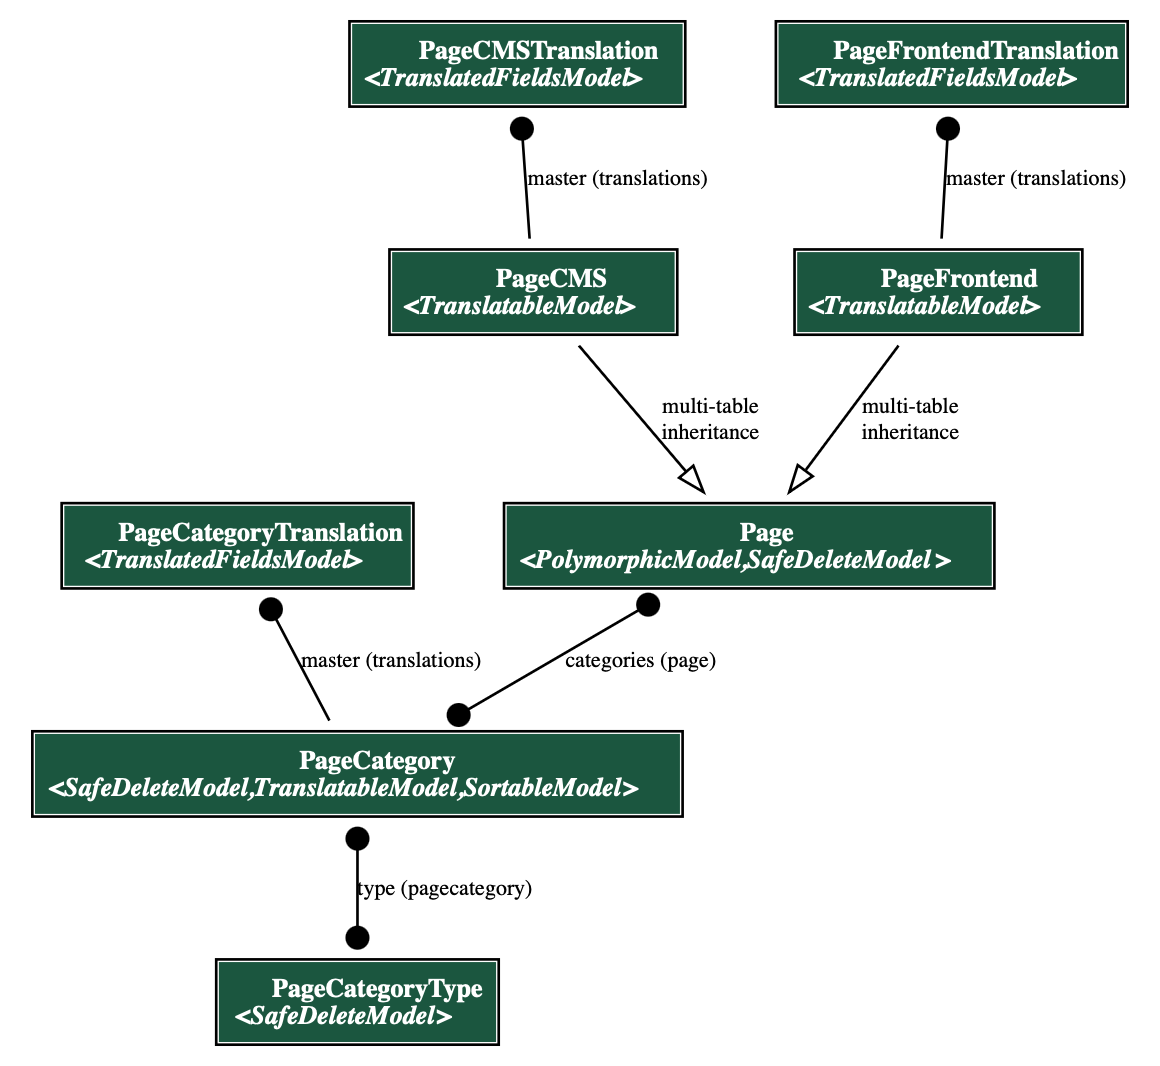
Above is the diagram of the CMS models with its main relations. Models are defined in backend/core/cms/models.py file. It allows to create content pages with different types of content. The main model is PageCMS model, which represents a page with content in a specific language. It contains a content field in editorjs language. PageFrontend is an unussual idea in ecommerce platform. Since can have some specific pages that might not be stored in the database but would be represented as a HTML/JSX page, PageFrontend is simply a link to that page - or, to be clear, path of that page in the frontend. Why do we need that? Imagine a situation where you simply want some extra CSS styles or some specific layout of the (landing) page. It’s made directly in the frontend app and you simply store link in the database.
This is perfectly usefull if you consider other model PageCategory which basically puts a page in a category. This allows you to create a group of different PageCMS and PageFrontned. For example, you can create a category Info pages and put all your info pages in it.
We can go a bit further and create PageCategoryType, which can group these categories. For example, you can create a PageCategoryType Footer and put all your categoreis that should display in footer. You can then fetch those footer specific categories and display them in the footer of your website. This is a very flexible way of creating content pages and displaying them in the frontend.
Cart
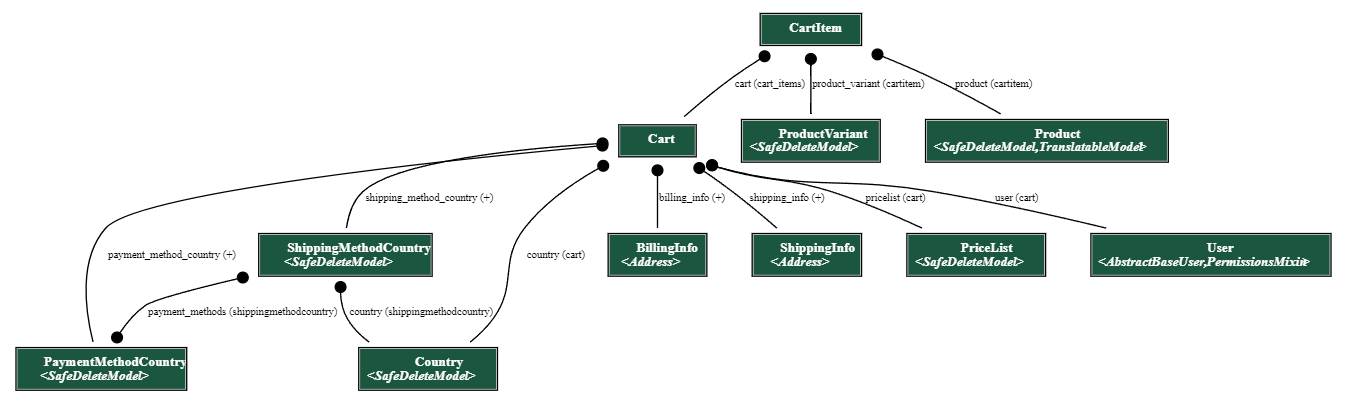
Above is the diagram of the Cart model with its main relations to other models. The model is defined in backend/core/cart/models.py file.
The Cart model is used to store user’s cart. It has a FK to User model, which binds the cart to the user. It also has a FK to ShippingMethodCountry and PaymentMethodCountry models, which are used to store user’s selected shipping and payment methods.
We also have a CartItem model, which represents concrete item in the cart and has a FK relation to Cart. Each CartItem also has a FK to ProductVariant and Product models, to bind the item with the concrete product.
The Cart model also has relations to country specific models such as Country, PriceList, PaymentMethodCountry and ShippingMethodCountry to ensure that the cart is bind to the concrete country specific data.
Order
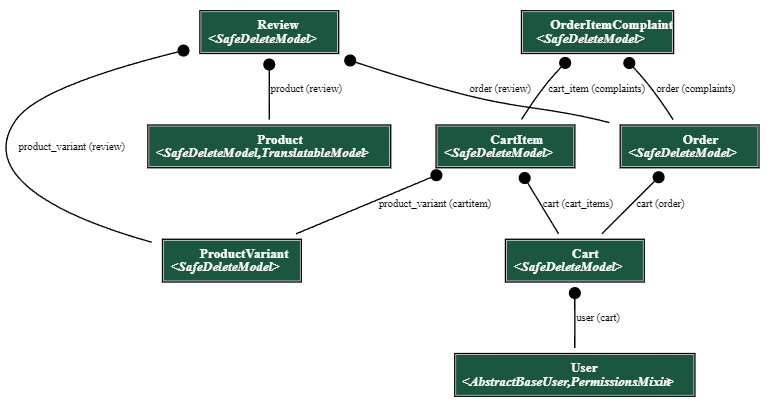
Once the user creates an order, new relation is created - a FK from Order model to Cart.
We can see also another model in the diagram - Review, which is used to store user’s reviews of products. It has a FK to ProductVariant, Product and Order models.
Furthermore, there’s also OrderItemComplaint model representing complaints (either warranty claim or request for return of an item), which has FK to CartItem and Order tables.
User
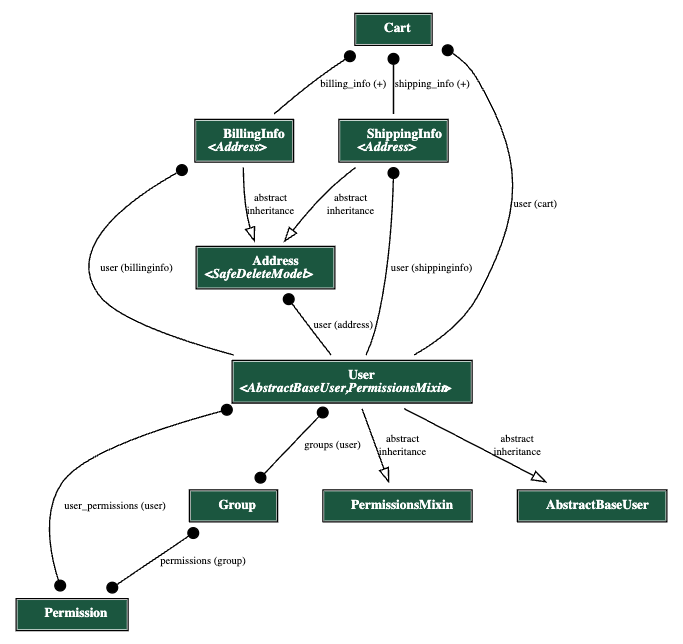
Above is the diagram of the User model with its main relations to other models. The model is defined in backend/core/user/models.py file.
In ecoseller, we replaced default django User model with our own User model in order to have more control over it. You can see that it has 2 abstract models as its parents: AbstractBaseUser and PermissionsMixin:
AbstractBaseUseris a django abstract model that provides basic user functionalityPermissionsMixinis a django abstract model that provides permissions functionality.
Another authorozation related models are Group and Permission models. They are django models that are used for authorization purposes. Group model is used to group users into units, while Permission model is used to define permissions for users. More on how we handle user authorization can be found in Authorization section.
Next important relation is to Address model. It is used to store user’s address. As we can see, there is also a connection to ShippingInfo and BillingInfo, which are used during checkout process, to store user’s shipping and billing information. The last relation is to Cart model, which binds user to his cart.
SafeDeleteModel
Note that all ecoseller models inherit from SafeDeleteModel class, which looks like this:
class SafeDeleteModel(models.Model):
    objects = SafeDeleteManager()
    safe_deleted = models.BooleanField(default=False)

    ...

    def delete(self, *args, **kwargs):
        self.safe_deleted = True
        self.save()

    ...
We can see, that this class basically adds one field (safe_deleted) and overrides delete method.
This way we implement safe deletion, so every time we call delete method on a model, it’s not physically removed from the DB, rather marked as deleted.
Also note, that we also override objects class variable in order to return just non-deleted products when querying.
So, if you call e.g.
Product.objects.all()
only the non-deleted products (i.e. those with safe_deleted = False) are returned.
Authorization
As mentioned in Authorization section, ecoseller uses roles and permissions to restrict access to certain parts of the application.
To have better control over permissions representation and their grouping, we created 2 new models:
ManagerPermission- for permission representation. It consists of:name- name of permission with predefined format: <model_name>_<permission_type>_permission.model- name of model to which this permission correspondsdescription- text description of permissiontype- type of permission. Enum of 4 possible values:viewaddchangedelete
ManagerGroup- for group representation. It consists of:name- name of groupdescription- text description of grouppermissions- M2M field to permissions of which this group consists.
Each group/permission should be convertable to DRF group/permission.
RolesManager
RolesManager is our internal python class for handling permissions and (almost) everything related to them. It consists purely of static methods, so we can call them anywhere across the code.
Its main usage is:
- Loading initial predefined roles from config and creating
ManagerGroupandManagerPermissionobjects from it - Conversion between
DRF GroupandManagerGroup, and also betweenDRF PermissionandManagerPermission
Initial roles definitions and their loading
As mentioned earlier, we have roles.json config file which has initial roles definition and RolesManager class which is responsible for loading it. We achieved this behaviour by following adjustments:
- We created
initial_data.pyfile along withpopulate_groupsmethod in it. In this method, we :- load
roles.jsonconfig withRolesManagerclass and create instances ofManagerGroupandManagerPermission - Create DRF Groups from loaded
ManagerGroupobjects - Create general DRF permissions from
app_config - Convert all DRF permissions to
ManagerPermissionobjects - Assign
ManagerPermissionobjects to correspondingManagerGroupobjects
- load
- We put
populate_groupsmethod in ourusermigration file0002_auto_20230316_1534.pyto theoperationspart - this will ensure that when this migration runs, it will also triggerpopulate_groupsmethod
Protecting views with permissions
In order to apply our permission restrictions, we defined two custom decorators are defined: @check_user_access_decorator and @check_user_is_staff_decorator (their definition can be found in backend/core/roles/decorator.py).
@check_user_access_decorator
The decorator is used mainly for POST, PUT and DELETE views.
It checks if the user has the permission to perform the action. If the user has the permission, the view is executed. Otherwise, the view returns 403 status code.
Parameters
permissions: Set of permissions that the user needs to have to access view
Usage example
To check whether the user has product_change_permission permission for accessing put method, put decorator above the method:
    @check_user_access_decorator({"product_change_permission"})
    def put(self, request, id):
        return super().put(request, id)
@check_user_is_staff_decorator
The decorator is used mainly for GET views. It checks if the user is staff (is_staff field in User model). If the user is staff, the view is executed. Otherwise, the view returns 403 status code.
Parameters
- None: The decorator does not take any parameters
Usage example
To check whether the user is staff for accessing get method, put decorator above the method:
    @check_user_is_staff_decorator()
    def get(self, request, id):
        return super().get(request, id)
Email sending
Important part of an e-commerce application is sending emails to users. In ecoseller, we use build in django.core.mail module for sending emails.
However there’s a sophisticated logic behind it, which is described below. It allows us to have DRY code and to have better control over email sending process which are passed through our Djagno RQ.
SMTP settings
In order to send emails, it’s necessary to have SMTP server and provide configuration for it. It’s done in backend/core/settings.py file via EMAIL_* variables that can be passed through environment variables.
EMAIL_USE_SSL=1
EMAIL_PORT=465
EMAIL_HOST=smtp.example.com
EMAIL_HOST_USER=yourusername
EMAIL_HOST_PASSWORD=yourpassword
EMAIL_FROM=Example<example@example.com>
Email templates & objects
We’ve created Email object in backend/core/emails/email/base.py file which is used as a base class for all email objects.
Email templates
We make usage of Django templating system for rendering email templates. All email templates are located in backend/core/templates/email directory. Each email template has its own HTML file with variables that are rendered with context generated by generate_context method of Email object.
Email translation
You can, of course translate email templates and strings contained in it. It’s done using Django {% load i18n %} tag in the template.
With that included we can use {% translate 'str_id' %} tag provided by Django to translate strings. For more information about Django translation, please refer to Django documentation and for generating translation files, please refer to ecoseller administrative documentation.
Email objects
Ecoseller is provided with a main class called Email that serves as a base class for all “emails” having following methods and attributes:
generate_context- method for generating context for email template. It’s used for rendering email template with context.generate_subject- method for generating email subject. It’s used for generating email subject.send- method for sending email. It’s used for sending email with rendered template and generated subject to the user. If object propertyuse_rqis set toTrue, it will send email via RQ. Otherwise, it will send email synchronously.send_at- method for sending email at specific time. It’s used for sending email with rendered template and generated subject to the user at specific time. If object propertyuse_rqis set toTrue, it will send email via RQ. Otherwise, it won’t be sent.use_rq- property for determining whether email should be sent via RQ or not. It’s set toFalseby default.recepient_list- property for determining recepients of the email. It’s set to[]by default.language- property for determining language of the email. It’s set tocsby default and can use onlysettings.PARLER_LANGUAGES
Pre-defined email classes
ecoseller has pre-defined email objects that are used for sending emails to users. They are located in backend/core/emails/email directory.
OrderItemComplaintConfirmationEmail
This email is sent to the user when they create a complaint for an order item. It’s used for confirming that the complaint was created successfully.
OrderItemComplaintStatusUpdateEmail
This email is sent to the user when the status of their complaint is updated. It’s used for informing the user about the status of their complaint.
EmailOrderConfirmation
This email is sent to the user when they create an order. It’s used for confirming that the order was created successfully.
EmailOrderReview
This email is sent to the user 14 days after the order was created. It’s used for asking the user to review the order.
Let’s dive into the code of EmailOrderReview object to see how it works:
class EmailOrderReview(Email):
    template_path = "email/generic_email.html"

    def __init__(self, order, recipient_list=[], use_rq=False):
        self.order = order
        self.language = order.cart.country.locale
        self.recipient_list = recipient_list
        self.use_rq = use_rq
        self.meta = {
            "order": self.order.pk,
            "type": "order_review",
            "language": self.language,
            "recipient_list": self.recipient_list,
        }

    def generate_subject(self):
        translation.activate(self.language)
        self.subject = _("Review your order")

    def generate_context(self):
        translation.activate(self.language)
        storefront_url = settings.STOREFRONT_URL
        self.context = {
            "main_title": _("Please review your order"),
            "subtitle": _("Hello,"),
            "body": _("We would like to ask you to review your order. "),
            "button_title": _("Review your order"),
            "button_link": f"{storefront_url}/review/{self.order.token}",
        }
As you can see, the EmailOrderReview object has template_path property set to email/generic_email.html. It means that the email will be rendered with email/generic_email.html template. Based on the generate_context method we can see that email will render with following context:
{
    "main_title": _("Please review your order"),
    "subtitle": _("Hello,"),
    "body": _("We would like to ask you to review your order. "),
    "button_title": _("Review your order"),
    "button_link": f"{storefront_url}/review/{self.order.token}",
}
We can see that the context contains button_link variable which is used for generating button in the email. The button will have Review your order title and will redirect the user to the storefront_url with /review/{self.order.token} path.
generic_email.html can be used for multiple usecases - for informational email or for email with CTA button. It’s up to you how you use it.
Sending emails
There’re situations when we need to send emails to users. For example, when the user creates an order, we need to send them an email with order confirmation. For that, we use EmailOrderConfirmation object. But how and where do we call it?
For this purpose, we’ve NotificationsAPI which is used to react to events that happen in the system. For example, when the user creates an order, we call ORDER_SAVE event and send order object as a payload. Then, via proper configuration, we can call backend/core/api/notifications/connectors/email.py which will send EmailOrderConfirmation object to the user based on send_order_confirmation passed from backend/core/config/notifications.json as method to the type EMAIL.
"ORDER_SAVE": [
    {
      "type": "EMAIL",
      "method": "send_order_confirmation"
    },
    ...
  ],
Product filtering & ordering
In this chapter, we’ll describe product filtering and ordering, which is used for storefront, in more detail.
First of all, it’s important to mention several important things
- On the storefront category page, products are displayed, however attributes (and therefore filters) are assigned to product variants. So, the filtering is done in a following way:
A product matches the filters if there’s at least 1 of its variants matching them. - In Core, there are 2 endpoints for getting the products in a given category:
- GET
category/storefront/<int:pk>/products/– used for initial getting of the products (with no filters selected) - POST
category/storefront/<int:pk>/products/– used for getting products with filtering & order selected. It’s neccessary to pass the object containing selected filters and ordering in the request body. Note that this object can be possible quite complex, so we decided to implement it using POST method and pass the data in request body, instead of another GET.
- GET
- Both filtering and ordering is done using DB queries, in order to optimize the performance.
When filtering products (using the POST request mentioned before), you should pass JSON with the following structure in a body:
{
  "filters":{
    "numeric": [...],
    "textual": [...],
  },
  "sort_by": "...",
  "order': "...'
}
filters– contains serialized filterssort_by– denotes a value which should be used for ordering productsorder– denotes ordering of products (ascending/descending), possible values are:asc(default) anddesc
We’re going to describe sort_by field in more detail, because the logic is a little bit more complex here.
That’s because we often want to sort products by a value, that’s not directly present in Product or ProductVariant objects (e.g. title, which is stored in multiple translations or price, which is stored in a separate object ProductPrice, as you can see here).
We decided to implement ordering in a following way:
CategoryDetailProductsStorefrontView contains static property SORT_FIELDS_CONFIG, which contains configuration of possible orderings and looks as follows:
SORT_FIELDS_CONFIG = {
  "title": {
      "sort_function": _order_by_title,
      "additional_params": [locale],
  },
  "price": {
      "sort_function": _order_by_price,
      "additional_params": [pricelist],
  },
  "recommended": {
      "sort_function": _order_by_recommendation,
      "additional_params": [recommendations],
  }
]
We see that there are 3 possible orderings:
- by title
- by price
- by recommendation
Each of the possible orderings needs to have configured
sort_function– reference to function used for sorting by this valueadditional_params– array of additional parameters that are passed to the sort function, except the list of products and ordering type (asc/desc) which are passed always. You can omit this field if there are no additional params, the default value – empty list will be used
Then, the sort function looks like this:
def _order_by_price(products, is_reverse_order, pricelist: PriceList):
    """
    Extend product query by extra field with lowest price of the product's variant prices
    """

    products = products.annotate(
        price=Subquery(
            ProductPrice.objects.filter(
                product_variant__in=OuterRef("product_variants"),
                price_list__code=pricelist.code,
            )
            .order_by("price")
            .values("price")[:1]
        )
    ).order_by("price" if not is_reverse_order else "-price")
    return products
We see that the function above sorts the products by their price; note that it contains an extra parameter (pricelist), which was specified in additional_params.
Again, it’s important to mention that the first 2 arguments (products and is_reverse_order) are passed to any sort function.
If your goal is to add another product ordering, you need to firstly implement a sort function in a similar way as above and then add it to SORT_FIELDS_CONFIG as well.
Also note, that on storefront, filters for each category are stored in session storage, so when an user e.g. filters the products, goes to product detail page and then back, the same filters as before are applied.
Static files and media
ecosellercurrently supports storing static and media files using local storage. While it does not natively integrate with object storage services like Amazon S3, it is possible to implement such functionality using the Python package s3boto3.
However, in most cases, storing static and media files locally is sufficient for the needs of an e-commerce platform. Hence, why we decided to use simplest solution possible using WhiteNoise package. It was neccassary to use this package because of the way Django works. Django does not serve static files in production, so serving the app via Gunicon or uWSGI would not work propely. WhiteNoise is a middleware that allows Django to serve static files in production.
If you want to disable WhiteNoise, you can change MIDDLEWARE in backend/core/settings.py to:
MIDDLEWARE = [
    # ...
    "django.middleware.security.SecurityMiddleware",
    "whitenoise.middleware.WhiteNoiseMiddleware", # Remove this line
    # ...
]
Implementing payment methods (PaymentAPI)
This guide will walk you through the process of extending the Core application with new payment methods without encountering conflicts with the existing codebase. By following the provided guidelines and leveraging the system’s flexible architecture, you’ll be able to seamlessly integrate various online payment gateways into your ecosellerecommerce platform.
Integrating online payment gateways into your ecommerce system offers numerous advantages. It allows your customers to securely make payments using their preferred payment methods, which can boost conversion rates and provide a seamless checkout experience. The ecosellersystem’s architecture has been designed to make the implementation of new payment methods straightforward, enabling you to expand your payment gateway options as your business grows.
Payment Gateway Integration Process
To implement a new payment method within the ecoseller ecommerce system, you will need to follow these steps:
-
Choose the appropriate base class: Your new payment method should inherit from either the
PayBySquareMethodclass or theOnlinePaymentMethodclass. Both of these classes are derived from theBasePaymentMethodclass and can be imported fromcore.api.payments.modules.BasePaymentMethod. Select the base class that aligns with the requirements of the payment gateway you are integrating.PayBySquareMethodis used in situations where it’s neccessary to provide user payment QR code. On the other handOnlinePaymentMethodis used for generating link for third party payment gateway where is user usually redirected. Note that classes inherited fromBasePaymentMethodobtain instance ofOrdermodel (seecore.order.models) on initialization. So you can freely access data ofOrderandCart. -
Create a new payment method class: In your codebase, create a new class that extends the chosen base class. Ideally put your code into separate file stored in
core/api/payments/modules. Provide a meaningful name for the class that reflects the payment gateway you are integrating. For example, if integrating the “XYZ Gateway,” you could name your class XYZGatewayMethod. Implement the necessary methods:
PayBySquareMethod
PayBySquareMethod is used to return Base64 encoded image and provide payment data such as IBAN, BIC, etc. In order to implement a payment method inherited from PayBySquareMethod you need to define two methods:
pay- it’s expected that this method return a dictonary containing two required keys.-
qr_code- Base64 encoded image of the payment QR
-
payment_data- dictionary containing payment information stored in text with keys such asamount,IBAN,payment_identification, etc.
status- method returningPaymentStatus(core.api.payments.conf.PaymentStatus). So for example - calling API of your bank and checking icomming payments.
OnlinePaymentMethod
OnlinePaymentMethod is used to return payment link so that user can be redirected. In order to implement a payment method inherited from OnlinePaymentMethod you need to define two methods:
pay- it’s expected that this method return a dictonary containing two required keys.-
payment_url- link to the payment gateway (usually provided by the payment gateway API withpayment_idin it).
-
payment_id- ID of the payment in the payment gateway
status- method returningPaymentStatus(core.api.payments.conf.PaymentStatus). Usually implemented as a wrapper around payment gateway’s status getter.
Examples:
from .BasePaymentMethod import OnlinePaymentMethod, PayBySquareMethod
from ..conf import PaymentStatus


class TestGateway(OnlinePaymentMethod):
    def pay(self):
        return {"payment_url": "https://payment.url", "payment_id": "1234567890"}

    def status(self) -> PaymentStatus:
        """
        Moc status and return paid with some probability
        """
        import random

        if random.random() < 0.5:
            return PaymentStatus.PAID
        return PaymentStatus.PENDING

class BankTransfer(PayBySquareMethod):
    def pay(self):
        self.bic = self.kwargs.get("bic")
        self.iban = self.kwargs.get("iban")
        self.currency = self.kwargs.get("currency")
        self.variable_symbol = 123456789
        self.amount = 100

        return {
            "qr_code": "base64 encoded image",
            "payment_data": {
                "amount": self.amount,
                "currency": self.currency,
                "variable_symbol": self.variable_symbol,
                "iban": self.iban,
                "bic": self.bic,
            },
        }

    def status(self) -> PaymentStatus:
        """
        Mock status and return paid with some probability
        """
        import random

        if random.random() < 0.5:
            return PaymentStatus.PAID
        return PaymentStatus.PENDING
- Registering payment method in the
CoreIn order to let theCoreknow about your payment methods, you need to define JSON configuration file. This file can be stored anywhere within accessible space for thecore. However, to keep ecosellerpractices, we recommend to store this file incore/config/payments.json(default path). Your custom path must be stored in thePAYMENT_CONFIG_PATHenvironment variable.
It’s a dictionary containing unique identifiers of payment methods. Those identifiers are up to you, the only requirement is that you keep the unique constraint and that the name makes somehow sense. You will use this name also in the dashboard to link the payment method with your backend implementation.
Every payment method is required to have implementation key which is in the format {module}.{class}, so for example api.payments.modules.BankTransfer.BankTransfer or api.payments.modules.TestGateway.TestGateway. You can use optional key kwargs (keyword arguments) into which you can store everything constant that you want to access in the BasePaymentMethod implementation (it’s stored into self.kwargs variable 😉). Usually this is used to pass your IBAN, … into PayBySquareMethod or public key or path to public certificate into OnlinePaymentMethod .
Example:
{
    "BANKTRANSFER_EUR": {
        "implementation": "api.payments.modules.BankTransfer.BankTransfer",
        "kwargs": {
            "currency": "EUR",
            "bankName": "Deutsche Bank",
            "accountNumber": "DE12500105170648489890",
            "swiftCode": "DEUTDEDBBER"
        }
    },
    "BANKTRANSFER_CZK": {
        "implementation": "api.payments.modules.BankTransfer.BankTransfer",
        "kwargs": {
            "currency": "CZK",
            "bankName": "CŠOB",
            "accountNumber": "CZ5855000000001265098001",
            "swiftCode": "CEKOCZPP"
        }
    },
    "TEST_API": {
        "implementation": "api.payments.modules.TestGateway.TestGateway",
        "kwargs": {
            "merchant": "123456",
            "secret": "1234567890abcdef1234567890abcdef",
            "url": "https://payments.comgate.cz/v1.0/"
        }
    }
}
- Binding payment method to the implementation
So you have your payment method implementation ready and want to bind to your payment method object. On the
PaymentMethodCountrymodel is a field ready for this situation. There’re two ways to do it:
-
Using dashboard: Navigate to the detail of payment method (Cart/Payment Methods) in the dashboard, scroll to Country variants and set
API Requestfor required country variant. -
Using direct database access: Find
cart_paymentmethodcountrytable in your database and setapi_requestfield for the specific row the the value which you used as unique identifier of your payment method in theJSONconfig. So for exampleBANKTRANSFER_CZK. However direct database access is not recommended.
- Now you only need to process the data correctly on the storefront and you’re ready to go. So either redirect you user automatically, show the payment square or do something else. We tried to make it generic so that it’s not anyhow limiting for your specific use-case.
Recommendations
Because online payments are crucial part for customer’s safety and comfort, we recommend to use online payment gateways that are known to the users in specific country. For example, don’t use czech payment gateway for german customers and vice-versa. Use something that your customers know and are familiar with. Due to that we decided that we will allow to bind payment method implementation to every country variant.
Connecting external services (NotificationAPI)
This comprehensive guide will provide you with all the necessary information to seamlessly extend ecoseller’s functionality by leveraging external APIs. With the Notification API, you can effortlessly integrate your own systems and services to respond to specific events within the ecosellerplatform, such as product save, order save, and more.
The ecosellerNotification API empowers you to enhance your ecosellerexperience by enabling real-time communication and synchronization with external applications. By leveraging this API, you can ensure that your external systems stay up to date with the latest changes and events happening within ecoseller, allowing for a seamless and efficient workflow.
This documentation will walk you through the entire process of working with the Notification API in your application. You’ll learn how to configure endpoints and interpret the data sent by ecoseller.
Key Features of the Notification API:
Event-based Triggers: The notifications API allows you to define specific events within ecoseller, such as PRODUCT_SAVE and ORDER_SAVE. These events serve as triggers for the notifications.
Multiple Notification Types: The API supports various notification types, including RECOMMENDERAPI, HTTP, and EMAIL. You can choose the appropriate type based on your integration requirements.
Flexible Methods: Each notification type can have different methods associated with it. For example, for the RECOMMENDERAPI type, the method store_object is used, while for the HTTP type, methods like POST are utilized.
HTTP Integration: The API allows you to send HTTP requests to external endpoints by specifying the URL. This enables seamless integration with other systems or services that can receive and process the notifications.
Email Notifications: With the “EMAIL” type, you can send email notifications related to specific events. In the given configuration file, the “send_order_confirmation” method is used to trigger the sending of an order confirmation email. Customization: The JSON configuration file provides flexibility for customization. You can easily add or modify notification types, methods, and URLs based on your specific integration requirements.
Expandable Event List: The JSON configuration can be extended to include additional events and corresponding notifications. This allows you to adapt the API to match a wide range of events and actions within the ecosellerplatform.
By leveraging these key features of the notifications API, you can extend the functionality of ecosellerby seamlessly integrating with external systems, such as recommender engines, HTTP-based APIs, and email services. This enables you to create powerful workflows and automate processes based on specific events occurring within ecoseller.
Usage
Here is some example (default) NotificationAPI configuration.
Configuring Notification API configuration
To configure your notifications, you need to edit provided JSON configurations in the Core component.
The provided configuration might look like this:
{
    "PRODUCT_SAVE": [
        {
            "type": "RECOMMENDERAPI",
            "method": "store_object"
        },
        {
            "type": "HTTP",
            "method": "POST",
            "url": "http://example.com/api/product"
        }
    ],
    "ORDER_SAVE": [
        {
            "type": "HTTP",
            "method": "POST",
            "url": "http://example.com/api/order"
        },
        {
            "type": "EMAIL",
            "method": "send_order_confirmation"
        }
    ]
}
As you can see, for every trigger you can setup list of events that will be performed.
List of connectors
There are multiple actions you can perform using predefined connectors:
-
HTTPtype: this action requires to havemethodandurlprovided. As the title says,methodis mean as an HTTP Method. You can use all methods utilized by Pythonrequestsmodule. -
EMAILtype: you can control sending e-mails using internalemail app. Feel free to remove e-mail events that you don’t want to be sent using the Django interface. -
RECOMMENDERtype: if you don’t want to use provided recommendation system feature, feel free to remove events providing data to the recommender.
We recommend to edit configuration JSON directly (core/config/notifications.json). However, you can define your custom one and installing it by setting NOTIFICATIONS_CONFIG_PATH as your environment variable.
List of triggers
The triggers that you can respond to are derived from the ecoseller models. It’s usually an action based on save, update or delete.
Model based triggers
Make sure you are fammiliar with ecoseller data models. Events are then pretty self-explanatory. Here is the list of all events that you can respond to:
Product
Whenever product is saved, updated or deleted, you can respond to it using following events:
PRODUCT_SAVE
JSON Payload sent to the connector is the product itself simmilar to the example below:
{
   "_model_class":"Product",
   "id":2,
   "published":true,
   "type":3,
   "category_id":3,
   "product_translations":[
      {
         "id":3,
         "language_code":"en",
         "title":"Jumanji",
         "meta_title":"Jumanji",
         "meta_description":"When two kids find and play a magical board game, they release a man trapped in it for decades - and a host of dangers that can only be stopped by fin",
         "short_description":"None",
         "slug":"jumanji"
      },
      {
         "id":4,
         "language_code":"cs",
         "title":"Jumanji",
         "meta_title":"Jumanji",
         "meta_description":"Když dvě děti najdou a hrají kouzelnou deskovou hru, osvobodí muže, který v ní byl po desetiletí uvězněn - a spoustu nebezpečí, která lze zastavit pou",
         "short_description":"None",
         "slug":"jumanji"
      }
   ],
   "product_variants":[
      "2-cs-1080p",
      "2-en-720p"
   ],
   "update_at":"2023-07-09T17:35:11.713935+00:00",
   "create_at":"2023-07-09T17:35:11.713935+00:00",
   "deleted":false
}
PRODUCT_UPDATE
JSON Payload sent to the connector is the product itself simmilar to the example below:
{
   "_model_class":"Product",
   "id":2,
   "published":true,
   "type":3,
   "category_id":3,
   "product_translations":[
      {
         "id":3,
         "language_code":"en",
         "title":"Jumanji",
         "meta_title":"Jumanji",
         "meta_description":"When two kids find and play a magical board game, they release a man trapped in it for decades - and a host of dangers that can only be stopped by fin",
         "short_description":"None",
         "slug":"jumanji"
      },
      {
         "id":4,
         "language_code":"cs",
         "title":"Jumanji",
         "meta_title":"Jumanji",
         "meta_description":"Když dvě děti najdou a hrají kouzelnou deskovou hru, osvobodí muže, který v ní byl po desetiletí uvězněn - a spoustu nebezpečí, která lze zastavit pou",
         "short_description":"None",
         "slug":"jumanji"
      }
   ],
   "product_variants":[
      "2-cs-1080p",
      "2-en-720p"
   ],
   "update_at":"2023-07-09T17:35:11.713935+00:00",
   "create_at":"2023-07-09T17:35:11.713935+00:00",
   "deleted":false
}
PRODUCT_DELETE
JSON Payload sent to the connector is the product itself simmilar to the example below:
{
   "_model_class":"Product",
   "id":2,
   "published":true,
   "type":3,
   "category_id":3,
   "product_translations":[
      {
         "id":3,
         "language_code":"en",
         "title":"Jumanji",
         "meta_title":"Jumanji",
         "meta_description":"When two kids find and play a magical board game, they release a man trapped in it for decades - and a host of dangers that can only be stopped by fin",
         "short_description":"None",
         "slug":"jumanji"
      },
      {
         "id":4,
         "language_code":"cs",
         "title":"Jumanji",
         "meta_title":"Jumanji",
         "meta_description":"Když dvě děti najdou a hrají kouzelnou deskovou hru, osvobodí muže, který v ní byl po desetiletí uvězněn - a spoustu nebezpečí, která lze zastavit pou",
         "short_description":"None",
         "slug":"jumanji"
      }
   ],
   "product_variants":[
      "2-cs-1080p",
      "2-en-720p"
   ],
   "update_at":"2023-07-09T17:35:11.713935+00:00",
   "create_at":"2023-07-09T17:35:11.713935+00:00",
   "deleted":false
}
ProductVariant
Whenever product variant is saved, updated or deleted, you can respond to it using following events:
PRODUCTVARIANT_SAVE
JSON Payload sent to the connector is the product variant itself simmilar to the example below:
{
   "_model_class":"ProductVariant",
   "sku":"2-en-720p",
   "ean":"",
   "weight":189.0,
   "stock_quantity":63,
   "recommendation_weight":1.0,
   "update_at":"2023-07-18T10:27:19.559905+00:00",
   "create_at":"2023-07-09T17:38:10.811513+00:00",
   "attributes":[
      3,
      5,
      8,
      9,
      10
   ],
   "deleted":false
}
PRODUCTVARIANT_UPDATE
JSON Payload sent to the connector is the product variant itself simmilar to the example below:
{
   "_model_class":"ProductVariant",
   "sku":"2-en-720p",
   "ean":"",
   "weight":189.0,
   "stock_quantity":63,
   "recommendation_weight":1.0,
   "update_at":"2023-07-18T10:27:19.559905+00:00",
   "create_at":"2023-07-09T17:38:10.811513+00:00",
   "attributes":[
      3,
      5,
      8,
      9,
      10
   ],
   "deleted":false
}
PRODUCTVARIANT_DELETE
JSON Payload sent to the connector is the product variant itself simmilar to the example below:
{
   "_model_class":"ProductVariant",
   "sku":"2-en-720p",
   "ean":"",
   "weight":189.0,
   "stock_quantity":63,
   "recommendation_weight":1.0,
   "update_at":"2023-07-18T10:27:19.559905+00:00",
   "create_at":"2023-07-09T17:38:10.811513+00:00",
   "attributes":[
      3,
      5,
      8,
      9,
      10
   ],
   "deleted":false
}
ProductPrice
Whenever product price is saved, updated or deleted, you can respond to it using following events:
PRICE_SAVE
JSON Payload sent to the connector is the product price itself simmilar to the example below:
{
   "_model_class":"ProductPrice",
   "id":13,
   "price_list_code":"CZK_retail",
   "product_variant_sku":"2-cs-1080p",
   "price":229.0,
   "update_at":"2023-07-18T10:31:56.386815+00:00",
   "create_at":"2023-07-09T17:37:28.340365+00:00",
   "deleted":false
}
PRICE_UPDATE
JSON Payload sent to the connector is the product price itself simmilar to the example below:
{
   "_model_class":"ProductPrice",
   "id":13,
   "price_list_code":"CZK_retail",
   "product_variant_sku":"2-cs-1080p",
   "price":229.0,
   "update_at":"2023-07-18T10:31:56.386815+00:00",
   "create_at":"2023-07-09T17:37:28.340365+00:00",
   "deleted":false
}
PRICE_DELETE
JSON Payload sent to the connector is the product price itself simmilar to the example below:
{
   "_model_class":"ProductPrice",
   "id":13,
   "price_list_code":"CZK_retail",
   "product_variant_sku":"2-cs-1080p",
   "price":229.0,
   "update_at":"2023-07-18T10:31:56.386815+00:00",
   "create_at":"2023-07-09T17:37:28.340365+00:00",
   "deleted":false
}
ProductType
Whenever product type is saved, updated or deleted, you can respond to it using following events:
PRODUCTTYPE_SAVE
JSON Payload sent to the connector is the product type itself simmilar to the example below:
{
   "_model_class":"ProductType",
   "id":3,
   "name":"Movie",
   "attribute_types":[
      1,
      2,
      3,
      4
   ],
   "products":[
      6,
      10,
      16,
      1
   ],
   "update_at":"2023-07-18T10:34:06.786793+00:00",
   "create_at":"2023-07-08T15:38:32.982680+00:00",
   "deleted":false
}
PRODUCTTYPE_UPDATE
JSON Payload sent to the connector is the product type itself simmilar to the example below:
{
   "_model_class":"ProductType",
   "id":3,
   "name":"Movie",
   "attribute_types":[
      1,
      2,
      3,
      4
   ],
   "products":[
      6,
      10,
      16,
      1
   ],
   "update_at":"2023-07-18T10:34:06.786793+00:00",
   "create_at":"2023-07-08T15:38:32.982680+00:00",
   "deleted":false
}
PRODUCTTYPE_DELETE
JSON Payload sent to the connector is the product type itself simmilar to the example below:
{
   "_model_class":"ProductType",
   "id":3,
   "name":"Movie",
   "attribute_types":[
      1,
      2,
      3,
      4
   ],
   "products":[
      6,
      10,
      16,
      1
   ],
   "update_at":"2023-07-18T10:34:06.786793+00:00",
   "create_at":"2023-07-08T15:38:32.982680+00:00",
   "deleted":false
}
AttributeType
Whenever product attribute type is saved, updated or deleted, you can respond to it using following events:
ATTRIBUTETYPE_SAVE
JSON Payload sent to the connector is the attribute type itself simmilar to the example below:
{
   "_model_class":"AttributeType",
   "id":1,
   "type":"CATEGORICAL",
   "type_name":"GENRE",
   "unit":"None"
}
ATTRIBUTETYPE_UPDATE
JSON Payload sent to the connector is the attribute type itself simmilar to the example below:
{
   "_model_class":"AttributeType",
   "id":1,
   "type":"CATEGORICAL",
   "type_name":"GENRE",
   "unit":"None"
}
ATTRIBUTETYPE_DELETE
JSON Payload sent to the connector is the attribute type itself simmilar to the example below:
{
   "_model_class":"AttributeType",
   "id":1,
   "type":"CATEGORICAL",
   "type_name":"GENRE",
   "unit":"None"
}
BaseAttribute
Whenever product base attribute is saved, updated or deleted, you can respond to it using following events:
ATTRIBUTE_SAVE
JSON Payload sent to the connector is the base attribute itself simmilar to the example below:
{
   "_model_class":"Attribute",
   "id":9,
   "type":1,
   "raw_value":"Adventure",
   "order":"None",
   "ext_attributes":[

   ],
   "deleted":false
}
ATTRIBUTE_UPDATE
JSON Payload sent to the connector is the base attribute itself simmilar to the example below:
{
   "_model_class":"Attribute",
   "id":9,
   "type":1,
   "raw_value":"Adventure",
   "order":"None",
   "ext_attributes":[

   ],
   "deleted":false
}
ATTRIBUTE_DELETE
JSON Payload sent to the connector is the base attribute itself simmilar to the example below:
{
   "_model_class":"Attribute",
   "id":9,
   "type":1,
   "raw_value":"Adventure",
   "order":"None",
   "ext_attributes":[

   ],
   "deleted":false
}
Category
Whenever category is saved, updated or deleted, you can respond to it using following events:
CATEGORY_SAVE
JSON Payload sent to the connector is the category itself simmilar to the example below:
{
   "_model_class":"Category",
   "id":3,
   "parent_id":2,
   "deleted":false
}
CATEGORY_UPDATE
JSON Payload sent to the connector is the category itself simmilar to the example below:
{
   "_model_class":"Category",
   "id":3,
   "parent_id":2,
   "deleted":false
}
CATEGORY_DELETE
JSON Payload sent to the connector is the category itself simmilar to the example below:
{
   "_model_class":"Category",
   "id":3,
   "parent_id":2,
   "deleted":false
}
Order
Whenever order is saved, updated or deleted, you can respond to it using following events:
ORDER_SAVE
JSON Payload sent to the connector is the order itself simmilar to the example below:
{
   "token":"545107d5-59ad-41d6-9f70-782828afdce2",
   "customer_email":"jdoe@example.com",
   "order":{
      "token":"545107d5-59ad-41d6-9f70-782828afdce2",
      "cart":{
         "token":"c637d1b1-d5fd-4a15-a14f-1e57b6b94a4d",
         "cart_items":[
            {
               "product_id":159858,
               "product_variant_sku":"159858-en-720p",
               "unit_price_without_vat":"170.00",
               "unit_price_incl_vat":"205.70",
               "quantity":1
            }
         ],
         "shipping_method_country":1,
         "payment_method_country":1,
         "create_at":"2023-07-18T10:44:40.222194Z",
         "status":"PENDING",
         "marketing_flag":true,
         "agreed_to_terms":true,
         "payment_id":"None"
      },
      "_model_class":"Order",
      "session_id":"cc024f1d-160a-427c-a821-1e84126eb45f"
   }
}
ORDER_UPDATE
JSON Payload sent to the connector is the order itself simmilar to the example below:
{
   "token":"545107d5-59ad-41d6-9f70-782828afdce2",
   "customer_email":"jdoe@example.com",
   "order":{
      "token":"545107d5-59ad-41d6-9f70-782828afdce2",
      "cart":{
         "token":"c637d1b1-d5fd-4a15-a14f-1e57b6b94a4d",
         "cart_items":[
            {
               "product_id":159858,
               "product_variant_sku":"159858-en-720p",
               "unit_price_without_vat":"170.00",
               "unit_price_incl_vat":"205.70",
               "quantity":1
            }
         ],
         "shipping_method_country":1,
         "payment_method_country":1,
         "create_at":"2023-07-18T10:44:40.222194Z",
         "status":"PENDING",
         "marketing_flag":true,
         "agreed_to_terms":true,
         "payment_id":"None"
      },
      "_model_class":"Order",
      "session_id":"cc024f1d-160a-427c-a821-1e84126eb45f"
   }
}
ORDER_DELETE
JSON Payload sent to the connector is the order itself simmilar to the example below:
{
   "token":"545107d5-59ad-41d6-9f70-782828afdce2",
   "customer_email":"jdoe@example.com",
   "order":{
      "token":"545107d5-59ad-41d6-9f70-782828afdce2",
      "cart":{
         "token":"c637d1b1-d5fd-4a15-a14f-1e57b6b94a4d",
         "cart_items":[
            {
               "product_id":159858,
               "product_variant_sku":"159858-en-720p",
               "unit_price_without_vat":"170.00",
               "unit_price_incl_vat":"205.70",
               "quantity":1
            }
         ],
         "shipping_method_country":1,
         "payment_method_country":1,
         "create_at":"2023-07-18T10:44:40.222194Z",
         "status":"PENDING",
         "marketing_flag":true,
         "agreed_to_terms":true,
         "payment_id":"None"
      },
      "_model_class":"Order",
      "session_id":"cc024f1d-160a-427c-a821-1e84126eb45f"
   }
}
OrderItemComplaint
ORDER_ITEM_COMPLAINT_CREATED
JSON Payload sent to the connector is the order item complaint is created.
{
    "complaint_id": 1,
}
ORDER_ITEM_COMPLAINT_UPDATED
JSON Payload sent to the connector is the order item complaint is created.
{
    "complaint_id": 1,
}
Action based triggers
Action based triggers are based on user actions. They are not related to any model, they’re usually sent from storefront. Here is the list of all events that you can respond to:
Product page
PRODUCT_DETAIL_ENTER
This trigger reacts to the situation when user enters product detail page. Data passed to this action trigger are simply those that are sent from the storefront so you can easily extend it. In a basic configuration it’s just:
{
    "product_id": 1,
    "product_variant_sku": "1-en-720p",
    "session_id": "cc024f1d-160a-427c-a821-1e84126eb45f"
}
Make sure you don’t change these data, because they are required by recommender system.
PRODUCT_DETAIL_LEAVE
This trigger reacts to the situation when user leaves product detail page. Data passed to this action trigger are simply those that are sent from the storefront so you can easily extend it. In a basic configuration it’s just:
{
    "product_id": 1,
    "product_variant_sku": "1-en-720p",
    "session_id": "cc024f1d-160a-427c-a821-1e84126eb45f"
}
Make sure you don’t change these data, because they are required by recommender system.
PRODUCT_ADD_TO_CART
This trigger reacts to the situation when user adds product to the cart.
{
    "product_id": 1,
    "product_variant_sku": "1-en-720p",
    "session_id": "cc024f1d-160a-427c-a821-1e84126eb45f"
}
Use cases
NotificationAPI is here to help you. It’s up to you how you will use it, since it very convinient and flexible. Here are some examples of how we imagine you can use it. If you have any other ideas, feel free to share them with us.
Connecting cutom e-mail service
If you want to connect your custom e-mail service, you can do it by removing EMAIL events from the configuration and adding your own HTTP events that will send data to your custom e-mail service.
Connecting company internal API
If you want to connect your company internal API, you can do it by adding HTTP events that will send data to your custom API. For example data about orders (ORDER_SAVE, …) and complaints.
Connecting custom analytics
Make usage of action based triggers to connect your custom analytics. For example, you can track how many users are entering product detail page (PRODUCT_DETAIL_ENTER), how many of them are leaving it (PRODUCT_DETAIL_LEAVE) and how many of them are adding product to cart (PRODUCT_ADD_TO_CART).
Disconnecting recommendation system
If you don’t want to use provided recommendation system, you can remove RECOMMENDER events from the configuration. However, you can still use action based triggers to connect your custom recommendation or analytical system (if you keep storefront sending those data).